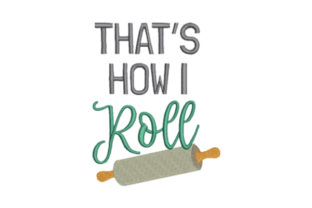
That’s How I Roll
A Kitchen Embroidery Design That Actually Fits Real Life
As a designer who’s stitched thousands of embroidery files onto aprons, tea towels, and custom totes for small shops and Etsy sellers, my first impression of That’s How I Roll wasn’t about fonts or file formats—it was about attitude. It lands with warmth, confidence, and just enough cheek to feel human—not generic, not forced. The phrase is compact but loaded: it reads instantly, fits comfortably on a curved apron pocket or the front chest panel of a relaxed-fit sweatshirt, and carries that rare kitchen charm that doesn’t shout “cute” but instead whispers, “I know what I’m doing—and I enjoy it.”
Where It Lives Best (and Why)
I tested That’s How I Roll on three real projects: a heavyweight cotton apron for a local bakery’s staff line, a set of linen tea towels for a holiday craft fair, and a lightweight organic cotton tote for a food blogger’s branded merch. In each case, the design held up—not as a novelty, but as part of the product’s voice. On the apron? It sat cleanly above the pocket, legible at arm’s length, with balanced spacing between letters and no visual crowding. On the tea towel? The stitch density felt intentional—dense enough to read clearly after repeated washing, but not so heavy it stiffened the fabric or pulled the weave. And on the tote? It stayed crisp even across the slight curve of the seam near the handle.
This isn’t a design built for tiny baby onesies or ultra-fine cap fronts. It’s made for confident, everyday surfaces: aprons, kitchen towels, sturdy totes, relaxed-fit sweatshirts, and pillow covers where personality matters more than precision-perfect miniaturization.
What Happens When You Stitch It for Real
Here’s what stood out in actual use:
- Lettering clarity holds up—no fused edges or fuzzy satin stitch transitions, even at medium hoop sizes (5x7" and up). The curves in the “R” and “O” are smooth, not jagged, and the baseline sits evenly without floating or sinking into fill areas.
- Stitch density feels thoughtful, not aggressive. No over-stuffing in corners or letter junctions—meaning less thread breakage, fewer bobbin changes, and cleaner results on textured fabrics like terry cloth or slubbed linen.
- No hidden traps: no micro-details that vanish on dark fabric, no thin connecting stems that snap under tension, and no tight kerning that bleeds on stretchy knits. It breathes.
Where to Pause—Not Panic
That said, That’s How I Roll isn’t magic. Like any strong machine embroidery design, it asks for context-aware choices:
- Small hoop sizes (under 4x4"): Not recommended unless resized carefully—and even then, test first. The lowercase “a” and “l” lose nuance when scaled down too far.
- Thin or sheer fabrics: Use tear-away + light cutaway stabilizer underneath. The fill stitches have presence, and without support, they’ll push through lightweight cotton voile or rayon blends.
- Dark or heavily textured backgrounds: Run a black-and-white mockup before finalizing thread colors. Some satin stitch highlights can mute on charcoal twill or looped terry—adjusting thread sheen (matte vs. high-sheen polyester) makes a visible difference.
- Curved surfaces (like caps): It *can* work—but only if hooped flat and digitized for low-profile stitching. Don’t assume it’s cap-ready without checking the original embroidery file’s underlay strategy.
Why It Builds Trust—Not Just Texture
When customers see That’s How I Roll stitched onto a handmade apron or gift-wrapped tea towel, they don’t just register the words—they register intention. This isn’t clip-art slapped on fabric. It’s a design that respects scale, rhythm, and wearability. For Etsy sellers, that translates directly to fewer “not what I expected” messages and more repeat buyers who recognize your taste. For boutique owners, it adds quiet professionalism—no need to explain the vibe; the embroidery does it.
It also works hard behind the scenes: as a digital embroidery file, it layers cleanly into printable mockups, scales well for social media previews, and reads clearly in both natural light and flash photography—critical for small shop product listings where first impressions happen in under two seconds.
Designer Notes You’ll Actually Use
Before stitching That’s How I Roll into your next finished product, here’s what I do—and recommend you do too:
- Test on scrap fabric *exactly* like your final piece—same weight, same wash history, same stabilizer combo.
- Check thread color contrast on both light and dark backgrounds—not just on screen. A warm gray might vanish on heather charcoal until you hold it up to daylight.
- Review stitch density visually: zoom in on the .dst or .pes preview. Look for overlapping fill areas or dense satin columns that could cause puckering on soft knits.
- Confirm hoop size compatibility. If you’re using a 4x4" machine, verify the design fits—or plan to split it (though this one flows best whole).
- Inspect corners and inner curves for stray running stitches or unnecessary travel jumps—these show up as lint traps or snag points on finished apparel.
- Use proper stabilizer: medium cutaway for knits, tear-away + light fusible for stable wovens, and water-soluble top for dense satin areas on dark fabric.
- Verify licensing terms before selling finished items or bundling the embroidery file as part of a craft business kit—especially if you’re an Etsy seller or digital product creator.
Final Thought: It’s Not Just a Phrase—It’s a Fit
That’s How I Roll earns its place because it understands its role: not as a standalone art piece, but as a quiet amplifier of handmade intention. It doesn’t distract from the apron—it completes it. It doesn’t compete with your brand voice—it reinforces it. Whether you're embroidering for personal joy, gifting a friend who bakes sourdough at 6 a.m., or stocking a kitchen-themed boutique, this machine embroidery design delivers clarity, character, and craft-level reliability. It’s the kind of embroidery file you keep in your “go-to” folder—not because it’s flashy, but because it simply works, every time.